Italian Dinner Party – Pt.2 Buttercup Squash with Carrot Pasta

Squash is in season! I don’t know why I get so excited about the fall but everything about it makes happy. The beautiful leaves, the crisp fresh smell of the air and the beginning of comfort food season; it just makes you feel all warm and fuzzy.  Although here in Vancouver there aren’t as many deciduous tress as there are back home in Ontario, which is something I missed until I heard some places ALREADY have snow! So I “put up” with most trees being green all year long. Something you could hardly call  an inconvenience. Okay, enough of this silly non-complaining. Let’s talk about the food.

In this photo I made orecchiette or at leased tried to make orecchiette.  but I find I prefer it with linguini. Which I’ll be making again since I’ll be explaining the pasta making process soon. Also I hope to post some pretty pictures to update with in a week or two since it’s now in my weekly rotation.

FYI Butternut squash is very similar to Buttercup squash so if you can’t find one you can use the other. Although buttercup is much easier for me to quarter than the other. Also the creole seasoning I use is Emeril Lagasse’s Bayou Blast. Just coat the chickpeas and pan fry until cooked through.

Pasta

Don’t forget to tell me what you think!

Ingredients     
1 medium Buttercup squash
1 tbsp olive oil
1/2 tsp fresh sage
Coarse salt and ground pepper
5 cloves garlic, peel on
1 cup full fat coconut milk or coconut creamer
4 servings carrot pasta
2 bunches of baby broccolini
2 cups creole seasoned chickpeas
 
Preparation
Preheat oven to 375 degrees. Using a large knife, trim ends; quarter the squash. Scoop out the seeds and peel.
Cut squash into 2-inch chunks; transfer to a baking sheet. Toss with oil and sage; generously salt and pepper. Scatter garlic around squash. Roast for 40 minutes, tossing once halfway through. Remove and discard skin from garlic.
Transfer squash and garlic to a food processor and puree. Add creamer or coconut milk; process until smooth. Add 1 to 2 cups water, until your preferred consistency is reached.
Cook pasta according to package or blog directions. Pour sauce over pasta; toss to coat. Top with creole seasoned chickpeas and steamed baby broccolini.
 
Creole Seasoning
2 1/2 tablespoons paprika
2 tablespoons salt
2 tablespoons garlic powder
1 tablespoon black pepper
1 tablespoon onion powder
1 tablespoon cayenne pepper
1 tablespoon dried oregano
1 tablespoon dried thyme
Combine all ingredients thoroughly.

Italian Dinner Party – Pt.1 Tuscan Stuffed Mushroom

Behold! The best mushroom caps ever made!

Behold! The best mushroom caps ever made!

I don’t know why I call these Tuscan mushroom caps. Probably because the smell and taste of olives and roasted red peppers brings to mind very old-world humble food, or maybe it’s the first name that came to mind. Either way they are delicious!  Don’t they look tasty? I thought so too… so much so that I made a double batch, cooked them early and ruined my dinner. Well that and half a loaf of pumpkin bread. That’s not necessarily a bad thing though because the main dish was homemade pasta and if you’ve ever tried to make pasta by hand you know it can be a bit of a pain in the butt. That’s all the hints on next week’s dish from me.

You will notice I suggest exposing the mushrooms to sunlight. This is because it turns them into little vitamin D2 bombs. Which if you’re a full time vegan you may have noticed it hard to find in food sources.  Also don’t throw away the mushroom stems or gills! They are great for tossing in stir fries, soups and of course gravy! Anyways it’s time for me to get back to my first of 4 consecutive 10 hour days. Wish me luck!


Ingredients

Don't they look yummy?

Don’t they look yummy?

10-12 Button Mushrooms (UV exposed for 20 mins)
1/3 cup olives 
1/3 cup roasted red peppers 
1/4 cup Nutritional Yeast 
1 tbsp Olive Oil 
Salt and Pepper to taste 
 
Preparation
Clean button mushrooms and place in sunlight for 20-30 mins. 
Preheat oven to 350 degrees.
Remove stems and gills. Place on a parchment lined baking sheet. 
Finely chop olives and roasted red peppers. Combine olives, red peppers, nutritional yeast olive oil and add a touch of salt and pepper to taste. 
Distribute the olive mixture into the mushrooms. Bake at 350 degrees for 15 to 20 minutes. 

Pumpkin Crazy!

For those of you here in Canada Happy Thanksgiving! It seems like forever since I’ve been posting. I seriously underestimated how insanely busy a cigar store can be in the summer. Now that the rainy season is starting to hit I finally have some days off to cook.

This weekend I made two of my favourite fall foods: pumpkin pancakes and pumpkin bread. I got so pumpkin crazy I added some leftover pure into my vanilla chai smoothie. The pumpkin bread is not an original recipe but it’s delicious and can be found at Hell Yeah it’s Vegan: Vegan Pumpkin Bread. Here’s how mine turned out.

This doesn't seem to do it justice!

This doesn’t seem to do it justice!

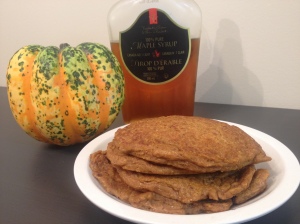
Now for my Pancakes! I love making these on Sunday mornings because  the house smells great for hours and I feel a little spoiled. Not to mention I’m always proud I got my veggies in during breakfast.  By using flax and safflower oil you are also giving yourself a nice balance of your omega 3’s & 6’s.  When it comes to family breakfasts I never mention these are vegan I just say their my Heart Healthy Pancakes!

This recipe is usually only enough for 2 because you will eat them until your body tells you you HAVE to stop.

Just missing the syrup on top!

Just missing the syrup on top!

Ingredients:
1 cup whole wheat flour
1/4 cup packed brown sugar
1 1/2 tsp baking powder
1/4 tsp salt
1 tsp cinnamon
1/2 tsp ground ginger
1/2 tsp nutmeg
1 tbsp of ground flax 
3 tbsp of water 
1 tbsp safflower oil (olive oil works well) 
1 cup coconut milk (or non dairy milk of choice)
1/2 cup pure pumpkin
 
Preparation:
Combine flax and water in a separate bowl and let stand while preparing dry ingredients. 
Whisk flour, sugar, baking powder, salt, cinnamon, ginger and nutmeg together in a medium bowl. Add flax mixture, oil, milk and pumpkin to the dry ingredients. 
 
For each pancake, scoop 1/4 cup of batter on to a hot griddle or nonstick skillet. Turn pancakes when bubbles appear and edges are cooked, after about 2 minutes. Cook for 1 1/2 minutes on second side.

Condensed Coconut Milk

I love living in Vancouver, the weather is always beautiful, it snows maybe once a year for a day and it’s large enough to have most if not all the vegan cooking ingredients I want. Each trip to a new store brings exciting ideas for my kitchen and sometimes something to add to my Why my mom should move here list. For example my wonderful boyfriend took me to a  Whole Foods grocery store the other day to pick up some agave syrup and a few organic veggies. While we were there we saw raw-vegan and singer-sonwriter Bif Naked. I know there are many celebrities in Vancouver and I do encounter them at work but I still thought I should add, chance encounters of celebrities my mom may have enjoyed listening to when she was my age to that list.

Coconut milk and agave syrup

Now to the food, condensed coconut milk or any vegan condensed ‘milk’ is not readily available on grocery store shelves, but it is easy to make. You only need 2 ingredients: 1 can of full fat coconut milk and agave syrup. I scaled down the original recipe by Detoxinista found here, since I don’t need or really want large quantities sitting in my fridge. It’s just way too tempting. So here’s my recipe.

Condensed Coconut Milk 

1 small can full-fat coconut milk

1/8 cup agave syrup

Directions:

Pour the coconut milk into a small saucepan, and heat over medium-high heat until boiling.

Stir in agave syrup, whisk until mixed and reduce heat.

Simmer for 30 minutes, stirring frequently until it’s reduced by half.

Korean Dinner Party – Pt.3 Patbingsu

Good afternoon online family and of course my real family. I know it’s taken a lot longer than expected for my Korean dessert but it is finally here. It’s a fairly simple recipe so I wanted to try my hand at making every ingredient from scratch. Doing so makes it a very time consuming dessert but in the end it’s worth it. For this recipe I’m opting for store bought rice cakes as it’s difficult to make them any better unless you want them in an unusual flavour.

What is Patbingsu? Patbingsu is a very popular Korean dessert that is made using fruits, shaved ice and sweetened adzuki beans.  Not only is it perfect on warm summer days but it can really fill you up given that the beans contain a large amount of protein. Now I’m sure you’re thinking “sweetened beans?! Thanks but no thanks.” I assure you it’s quite tasty!

For this recipe I’m using coconut water ice but really you can sub in any fruit juice ice. I would highly recommend watermelon ice if you are an active person. Watermelon  contains an amino acid called L-citrulline which has shown to accelerate removal of lactic acid from muscles. Not that anyone really needs an excuse to eat watermelon on a warm summer day.

Photo’s to follow shortly.

Patbingsu

1 cup Red beans (adzuki beans),

1 cup Agave Syrup (you can sub in raw sugar)

1 tsp Vanilla

1/2 tsp Salt

Coconut Water

Condensed coconut milk

Rice Cakes (Moochi)

2 Bananas

4 Kiwis

Pint of Strawberries

Directions 

Freeze coconut water in ice cube trays, making roughly one tray per person.

Fill a large pot with 4 cups of water and 1 cup of rinsed Adzuki beans. Bring to a boil and let simmer for one hour. After an hour test a bean to make sure it is soft all the way through, if so then drain beans.

Return beans to the pot along with 1 cup of agave syrup, 1/2 tsp of salt and 1 tsp of vanilla. Cook on low heat for 5 minutes or until the mixture has caramelized and sticks to the spoon.  Cool in the fridge.

Chop all fruits and rice cakes into bite size pieces.

Shave your ‘coconut cubes’ with an ice-shaver or the ice cube setting on your blender.

Now it’s time to build your Patbingsu! 

Place 1/2 cup of sweetened red beans in to a cup or bowl.

Top with a generous amount of coconut ice

Add 1/4 of your chopped fruit and 6 to 8 pieces of rice cakes

Finish with 2 tbsp of condensed coconut milk

Enjoy!

Korean BBQ Dinner Party – Pt.2 Bulgogi

This has to be my favourite seitan recipe, in fact I eat it about once a week. The pear and brown sugar caramelize when you fry it and give a texture and taste of real meat. You’ll swear tBulgogi in Rice Bowl here is beef fat in the protein.

This dish is best served with sticky rice and broccoli. Don’t be intimidated about making sticky rice it’s so easy to make on the stovetop you’ll wonder why you haven’t before. Also the broccoli doesn’t have to be fancy either, I usually just steam it and add a little soy sauce and sesame seeds to finish it off.

Try it and let me know how it works out!


Bulgogi

Ingredients

4 pieces/servings of beef seitan

1 crushed pear

¼ cup leek leaves

2 cloves of garlic

2 tbs soy sauce

2 tbs brown sugar

1 tbs toasted sesame oil

1 tbsp coconut oil

Directions

In a food processor combine pear, leek, garlic, soy sauce, brown sugar and sesame oil. Pulse until smooth.

Finely slice seitan and combine with marinade. Rest anywhere from 30 minutes up to 24 hours.

Heat a pan and oil, cook seitan on medium heat until browned. Serve with rice and broccoli.

Korean BBQ Dinner Party- Pt.1 Mandu

Last week I was watching a tv show about dinner parties and I was struck with an idea for my blog. I thought I should be doing vegetarian dinner party meal plans. It’s something that I’ve thought a lot about especially when I initially cut meat out of my diet. So I’m starting with a three part Korean BBQ theme. It’s very simple and the main really tastes like your eating animal fat on the barbecue steak.

Today I’m starting with the appetizer, Mandu. Mandu means dumpling in Korean and is traditionally served with equal parts vinegar and soy sauce for dipping. I find it tastes better smothered in sweet chili sauce but if you want to remain authentic use the soy-vinegar sauce.

Making your own dumplings may seem overwhelming but after you make your first batch it gets faster and faster. Just remember to purchase dumpling wrappers they are thicker than wonton wrappers and will prevent a meltdown in the kitchen. Also these freeze really well but there is a trick to it. Place the freshly made dumplings on parchment paper and place directly in the freezer. Once they are frozen you can place them in a ziplock bag and cook from frozen.

Anyways enough talking and more cooking!

20130621-212957.jpg

Mandu

10 Shitake Mushrooms

3/4 cup Portobello Mushrooms

3 cloves of garlic

1/3 cup leek

1 tbsp sesame oil

1 tbsp soy sauce

Dash of salt

1 tsp sugar

30-40 dumpling wrappers

Small glass or bowl of water

1 tbsp coconut oil (or whatever you have on hand)

Directions

Re-hydrate shitakes in warm water for 45 minutes to an hour.

Once shitakes are re-hydrated place in a food processor with Portobello mushrooms, leeks and garlic. Once mixture is finely processed transfer to a bowl.

Add sesame oil, soy sauce, salt and sugar to mushrooms and mix well.

Add a small spoonful of mixture into the center of the wrapper and fold in half. Use water from the cup or bowl to seal the edges.

Place finished dumpling on a parchment lined baking sheet, making sure not to allow the dumplings to touch.

Once all the dumplings are made heat a pan with oil and place dumpling in the pan. Brown each side and then add a splash of water and cover for 3 minutes. Turn the dumplings and cover for another 3 minutes.

Remove from heat and serve with a dipping sauce.


Spicy Vegan Beef and Bean Burritos

Shortly after I gave up meat I realized that I was also giving up one of my guilty pleasures – frozen spicy beef burritos. You know those sinful single burritos you’ve regretfully picked up at a 7-11 after a night of heavy drinking. Yes I love them!

After I figured out what seitan was and of course how to make it, I knew it wouldn’t be long before I was reunited with my favourite lazy burrito. I decided to do a trial run this week and it turned out just as good as the original. I used the Amy’s brand refried beans since they were sold out of pinto beans at my usual grocery store. If you do use the canned variety please check the ingredients because typically refried beans are made with lard. I hope you enjoy this as much as I do!

Spicy Vegan Beef and Bean Burritos

1 can or 1 1/2 cups Refried Beans

2 servings of beef seitan

3 chipotle peppers (remove seeds if you want it to be less spicy)

1 tsp of adobo sauce from the chipotle

1 tsp of mexican seasoning

1 tbsp coconut oil (you can use any kind I just prefer coconut)

8 small whole wheat tortillas

Instructions

Cut seitan into small cubes and pan fry with coconut oil and mexican seasoning until browned. Finely chop chipotle (de-seed if necessary) add to pan along with adobo sauce and refried beans.

Once mixture is heated through serve on tortillas. Alternatively you can roll them up and freeze them for a lazy lunch or late night snack just microwave on high for 2 minutes.

Slow cooker Beef Seitan

So it’s technically still Monday here on the west coast! Yes I know I’m a week late on publishing my beef seitan recipe but none the less here it is and it’s pretty darn good. So good in fact that my youngest dog Bonnie loves watching me make it; that and she enjoys sneaking into the recycling to sneak a taste of any leftover soy.

I really hope you enjoy this recipe.  It’s really easy to make and I find making seitan in the slow cooker is a completely fool proof way of cooking seitan.

“Beef” Seitan

Seitan

1 1/2 cups active wheat gluten

1/3 cup nooch (nutritional yeast aka yummiest thing ever)

1/2 of a 300g container of soft tofu

1 tbsp montreal steak spice

1 tsp cumin

3/4 cup cold water

1 tbsp olive oil

1 tbsp ketchup

1tbsp soy sauce (or Braggs)

2 tbsp of vegan beef broth

Broth

4 cups water

2 tbsp vegan beef broth

sprinkle of montreal steak spice

Directions 

Combine all dry ingredient in a large mixing bowl and be sure to mix well.

Combine water, oil, ketchup, soy sauce,  vegan beef broth and soft tofu in a separate bowl.

Add wet ingredients to the dry and knead with your hands for roughly 5 minutes. Separate dough into 2 part and roll them into 2 small loaves. Let rest for 1 hour.

After dough has rested cut each loaf into 4 pieces and place into slow cooker. Add broth to slow cooker and set to low and cook for 8 hours. If you’re like me and like to occasionally sleep in on your days off you can cook the seitan for 4 hours on high.

Guilt-Free Sweet Potato Boats

This week seems to have whizzed by! I’ve been playing around with what I’m cooking over the last two weeks and I think that adds to the pace. I mentioned in my Sticky Lemon Seitan post that I’d add my seitan recipe soon, so Monday I’ll be posting my chicken seitan recipe.

Tonight I’m making a new family favourite – Sweet Potato Boats! This dish was born out of a recipe I saw on pintrest. The original was loaded with cream cheese and other highly caloric ingredients so I changed things up and made it entirely guilt free. This can be made as a main or simply omit the seitan and serve it up as a side. Don’t be fooled though this is exceptionally filling.

Sweet Potato Boats

Ingredients

4 medium sweet potatoes

3 tbsp mexican seasoning (recipe below)

1 cup corn

1 can black beans

1 cup seitan

1/2 cup “cheese” of your choice

Directions

Wrap sweet potatoes in foil and bake at 350 degrees for 1 hour.

While sweet potatoes are baking place corn on a hot frying pan and add 1tbsp of mexican seasoning. Fry until corn is slightly blackened then transfer to a bowl.

Fry seitan in same pan with olive oil and remaining mexican seasoning  for 5 minutes. Transfer to the bowl of corn.

Add drained and rinced black beans to your bowl of corn and seitan. Mix well.

Once sweet potatoes are cooked allow them to cool until they are comfortable to handle. Cut lengthwise and scoop out the filling and mash.

Combine your corn mix to the mashed sweet potatoes along with 1/4 cup of “cheese”. Spoon back into sweet potato skins and cover with remaining cheese.

Return the sweet potato boats to the oven and broil for 15 minutes. Let cool and serve.

Mexican Seasoning 

Ingredients


2 tablespoons chili powder

1 tablespoon ground cumin

2 teaspoons cornstarch

2 teaspoons sea salt

1 1/2 teaspoons hot smoked paprika

1/2 teaspoon cayenne pepper


Directions
Put all of the ingredients in a small jar and shake to combine. Store in an airtight container for up to 1 month.